Back to Blog




Monica Jansen
Jul 7, 2026
How To Install SSL: A Comprehensive Guide
In a landscape where cyber threats are becoming more prevalent every day, ensuring your website’s security is paramount. One important aspect of online security that you can take advantage of is SSL encryption.
In this guide, we will:
- Define SSL
- Explain how it works
- List its advantages
- Cover SSL certificates, including:
- Teach you how to enable SSL in:
Read on to get started.
What Is SSL?
Secure Sockets Layer, more commonly known as SSL, is an encryption-based internet protection protocol. Its primary purpose is to ensure the privacy of data transmitted across the web.
Invented in 1995, SSL is commonly used on websites that handle sensitive credentials and personally identifiable information. SSL-encrypted sites are easy to recognize, as they have HTTPS in their URLs instead of the standard HTTP.
In addition, they display a padlock sign in the address bar to notify their visitors of this encryption type.
The Latest Iteration
In the 3 decades since its introduction, the SSL protocol has been improved and updated on several occasions.
The current version, which was revamped taking into account new security threats, is called TLS (Transport Layer Security). However, the acronym SSL stuck, so it is still in use today.
What Does SSL Do?
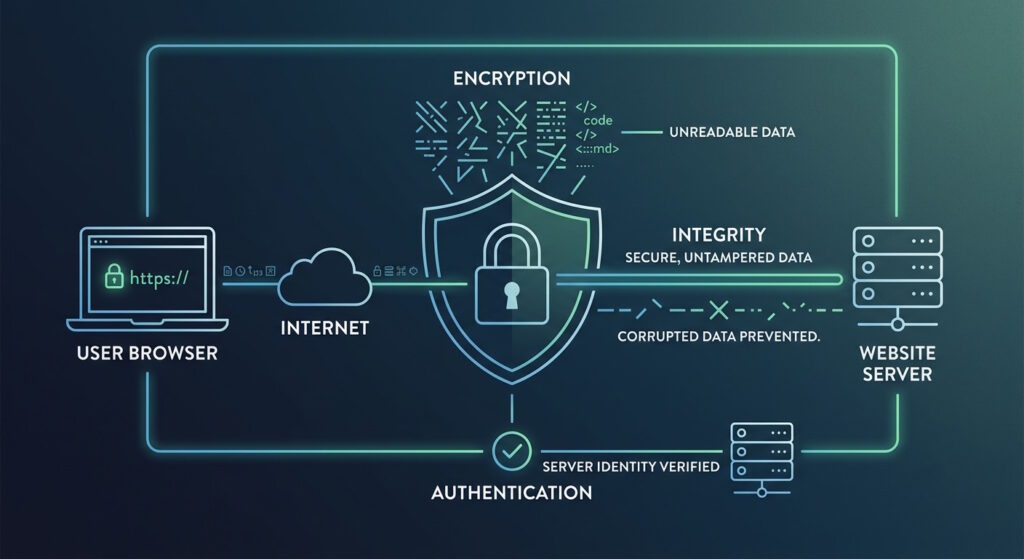
To ensure the highest level of user privacy, SSL establishes a secure connection between a browser and a web server. As a result, all information transferred between them remains fully confidential.
SSL encrypts data by turning it into an incomprehensible group of random characters and numbers. Thus, if anyone intercepts the data, they will not be able to decipher it and steal any relevant information.
Before the introduction of SSL, all data traveled across the web in its original form. For example, a customer would visit an online shopping platform and share their credit card information to make a purchase.
As soon as they submitted the data, anyone who intercepted the transaction would see the data exactly as it is, letting them steal and use it however they wished.
The Real Benefits
However, thanks to encryption, credit card info and other sensitive data isn’t usable outside the website(s) it's submitted to. Instead, outsiders see the information as a group of meaningless, scrambled characters.
To guarantee that only the two parties involved in the transaction have access to the data, SSL uses an authentication process called the handshake.
This process confirms the identity of both sides before allowing them to view and use the transferred information.
Additionally, SSL puts a digital signature on all transferred data. As a result, both parties can see if any information has been tampered with by checking whether the signature was changed.
Why Should You Enable SSL?
As we have already mentioned, enabling SSL on your website is a crucial step for ensuring data security.
That is especially true for websites that require users to input any sensitive information, including personally identifiable login credentials and financial details.
Prevent Data Breaches
By installing SSL, you can avoid breaches and, by extension, make your platform more trustworthy and credible. As a result, you’ll safeguard both everyone’s sensitive information and your platform’s reputation.
Rank Higher on Search Engines
SSL can also help your site rank higher, as most major search engines prioritize secure and trustworthy websites, meaning that using this type of encryption may allow you to significantly expand your reach.
Bolster User Confidence
Lastly, SSL can help inspire trust in your platform. Simply seeing HTTPS or a padlock sign in the address bar may make them more likely to shop in your store, create an account, or complete similar desired actions.
How Does Installing SSL Work?
To install SSL, a website needs an SSL certificate. This certificate acts as a digital ID and confirms the site’s name, public key, and other related information.
Thus, all devices attempting to access or communicate with said website will reference this data file to verify its identity.
Generally, website owners acquire SSL certificates via their hosting providers, cloud servers, or certificate authorities. The vast majority offer two main types of SSL certificates.
Free SSL Certificates
Usually included in a particular hosting plan, installed with a handful of clicks, and maintained and renewed by the hosting provider. These typically offer the most basic level of encryption.
Paid SSL Certificates
Included in premium plans, offering higher levels of encryption and validation, as well as additional security features, seals, and warranties. Such plans can be installed just as quickly as free options, and they may also be maintained by a particular hosting provider.
Generate Your Own SSL
It is also worth noting that intermediate users — i.e., those with more technical expertise — may generate their own free or paid SSL certificates.
This is usually done on platforms such as Let’s Encrypt and allows for more customization on the part of the website owner.
In fact, a number of hosting providers use similar tools for the certificates they include in their plans.
Types of SSL Certificates
Based on the number of domains and subdomains you operate, you can opt for one of 3 types of SSL certificates for your website:
- Single-domain SSL certificates
- Wildcard SSL certificates
- Multi-domain SSL certificates
Let’s explore each option in a little more detail.
Single-Domain SSL Certificates
As their name suggests, these certificates apply to a single domain and cannot be used to authenticate any of its subdomains. However, all pages within that domain will be SSL-protected.
Wildcard SSL Certificates
A wildcard SSL certificate applies to a single domain and all its active subdomains.
For instance, if you run a website such as www.yourdomain.com, this certificate will also cover the possible subdomains, such as blog.yourdomain.com, mail.yourdomain.com, and so on.
We have dedicated articles where we take a deeper look at how to create a subdomain using HestiaCP or aaPanel for those who want to learn more about this topic.
Multi-Domain SSL Certificates
Also known as MDC, these certificates list various domains, as well as all their subdomains. Thus, they allow owners to cover fully distinct domains with a single certificate.
SSL Certificate Validation Levels
When describing paid and free SSL plans, we mentioned that certificates can also differ in the strength of encryption that they offer (or the validation steps they require).
In this context, there are 3 certificate types that users can install. We will list them, along with their main features, in the sections that follow.
Domain Validated Certificates (DV SSL)
This certificate type is the easiest to obtain, which is why it is also the most commonly used. However, it also offers the least amount of security since it only consists of a one-step domain verification process.
Namely, a company only has to prove that they own the domain for which they want to obtain the SSL certificate. Once they do so, their website will be SSL-encrypted, albeit not nearly as safe as sites with higher encryption levels.
In practice, this level of protection is typically enough for blogs or platforms that do not handle financial transactions or require logins.
Organization Validated Certificates (OV SSL)
OV SSL certificates take website security to a higher level by employing several authentication steps that owners must complete.
Aside from domain validation, the website owner must also disclose other personal details if they are requesting a certificate as an individual, including:
- Their name
- Their physical address
- Their phone number
In case they are seeking a certificate for a business website, they must also submit official documents that verify the business’:
- Type (sole proprietorship, partnership, etc.)
- Status (whether it is officially registered with the relevant authority)
Since the verification process is longer and more complex, the website is more secure and fit to handle sensitive private information.
This certificate type is used by the vast majority of small and medium-grade businesses and commercial websites.
Extended Validation Certificates (EV SSL)
Lastly, the world’s largest brands and most secure financial, medical, and government institutions use EV SSL certificates.
These offer the highest level of security, as they entail several additional authentication steps that the organization must complete, including:
- Verifying a public phone number
- Disclosing the length of time in business
- Providing a registration number and jurisdiction for the business
- Completing domain fraud and contact blacklist checks
- Authenticating the owner’s employment status via phone call
Understandably, this type of security is the most expensive. As such, it is reserved for large corporations and the aforementioned institutions.
Enabling SSL for Your Website
As we have outlined above, you can acquire an SSL certificate directly via a certificate authority or through your hosting provider.
That said, the former option is quite time-consuming and unsuitable for those without any prior experience in this area.
On the other hand, obtaining a certificate through your hosting provider is infinitely easier, and it can be done in little time.
The Process
Installing or enabling an SSL certificate in this manner can vary based on the control panel used by your hosting provider. In subsequent sections, we will outline each step of this process in HestiaCP, aaPanel, and CyberPanel.
It is also important to follow any instructions provided by your hosting service to ensure a smooth installation process.
Also, please keep in mind that before you can install SSL, your domain will have to be connected to your server. If you need help with that process, check our guide on the topic.
Finally, if you happen to be using Cloudflare, you will have to turn off the proxy feature so that SSL can be activated. After activation, feel free to reactivate the proxy.
How to Install SSL In HestiaCP
For HestiaCP users, the installation process includes the following steps:
Step 1
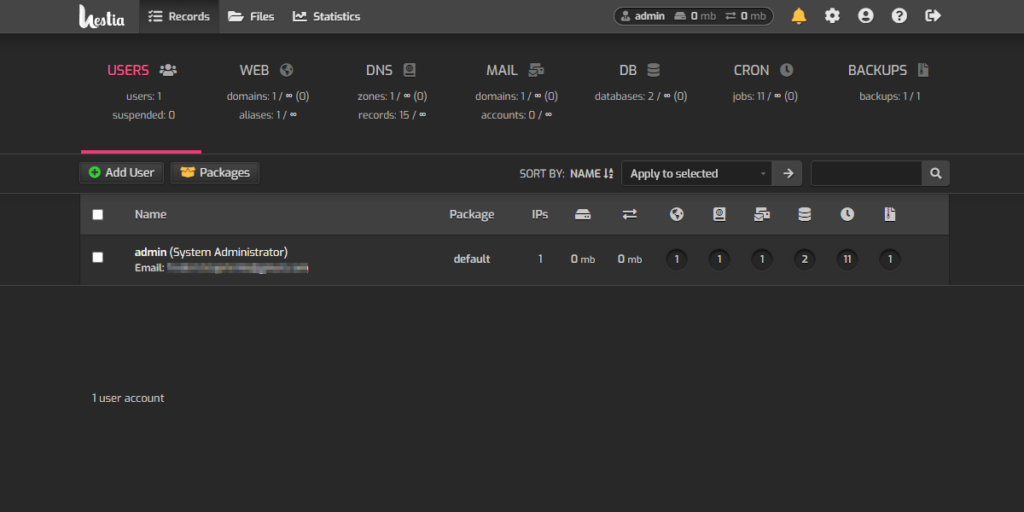
Log in to your HestiaCP account. You will see your homepage, as shown below.
Step 2
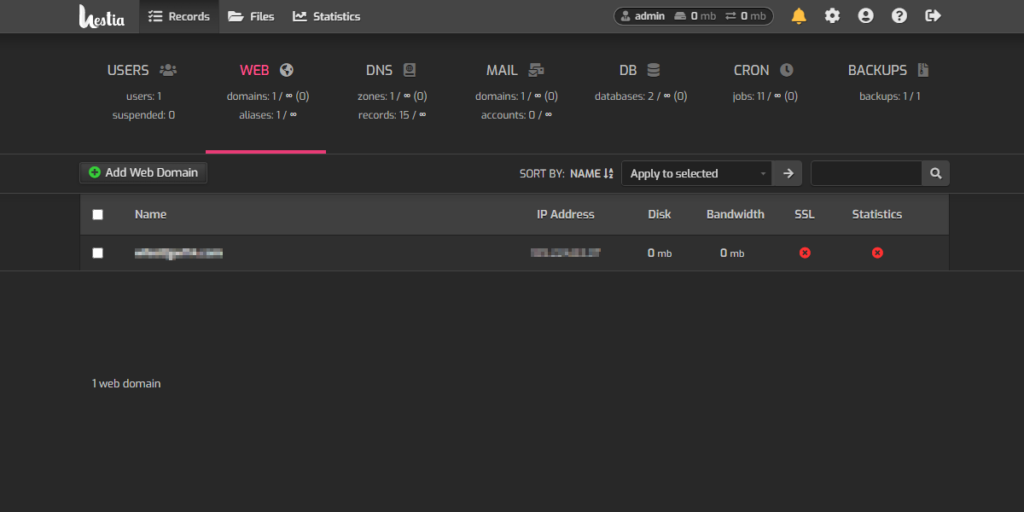
Click on WEB, positioned right next to the USERS tab.
Step 3
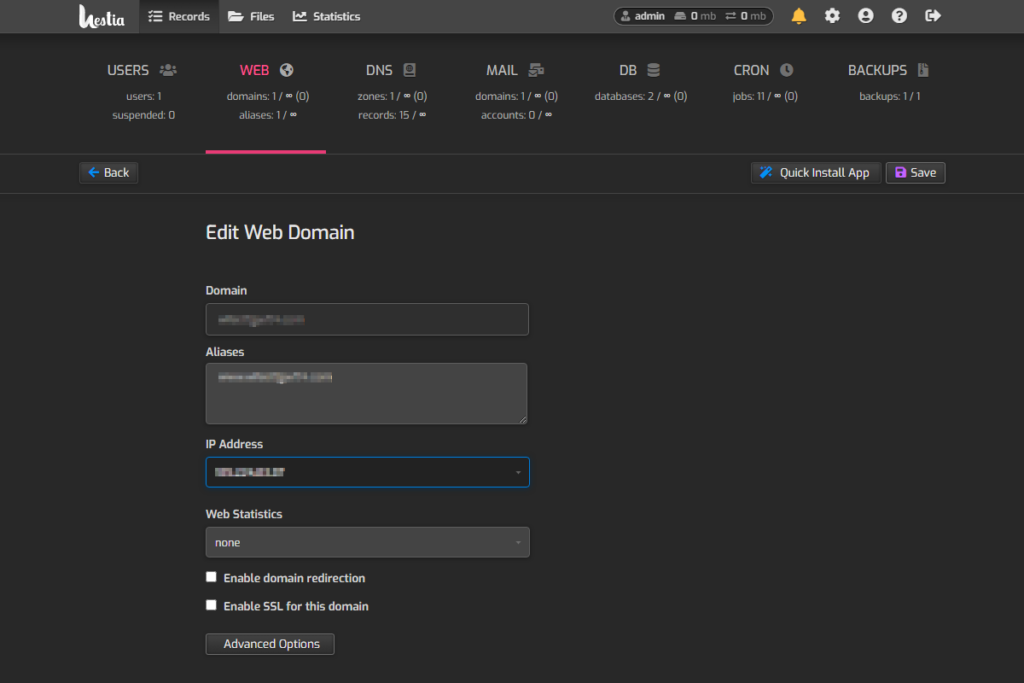
On the WEB page, move your cursor to your domain name and hover over it. Once a pencil icon appears, click on it. You will be taken to the Edit Your Domain page, as shown below.
Step 4
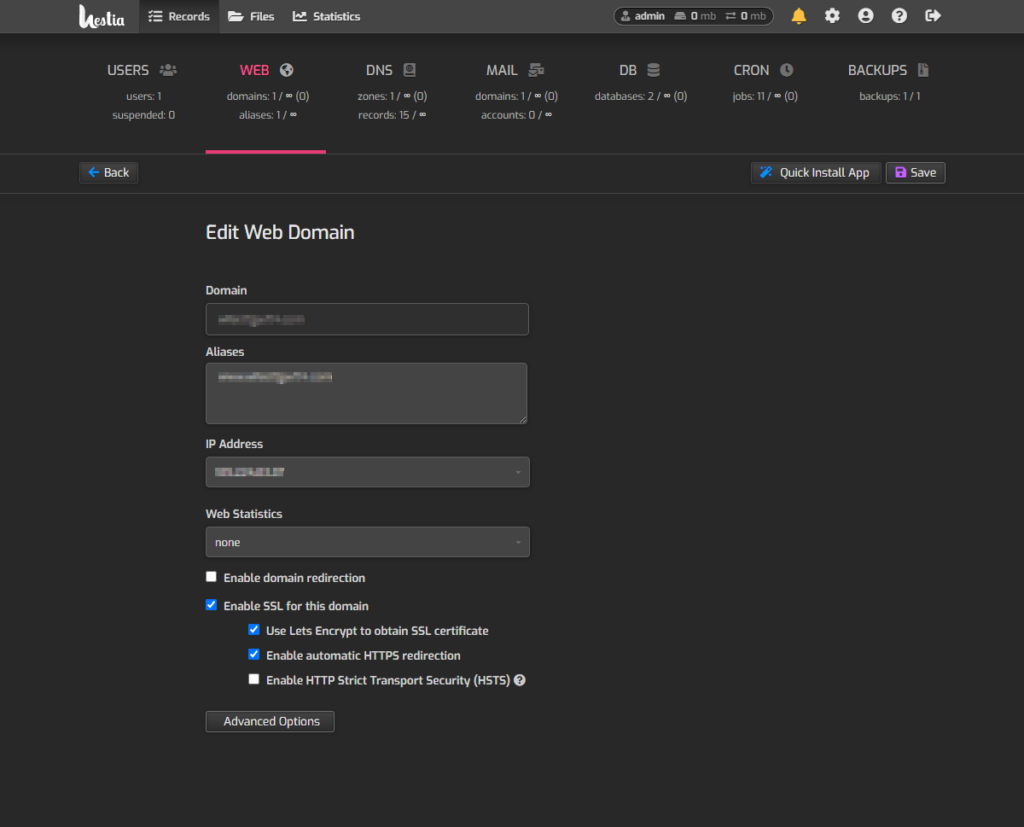
There, mark the Enable SSL for this domain checkbox. Once you do, a new checkbox menu will appear directly below.
Enable the first two checkboxes, titled Use Let's Encrypt to obtain SSL certificate and Enable automatic HTTPS redirection. Click Save, located in the screen’s upper right.
Step 5
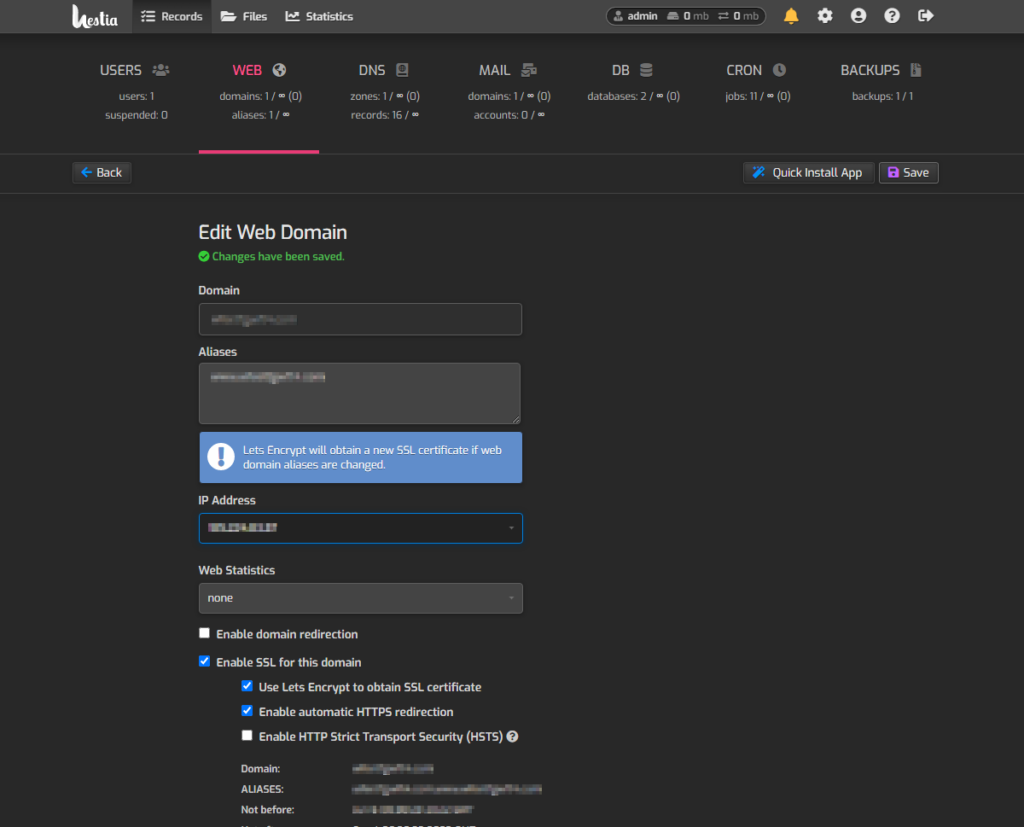
The final step is just waiting for the changes to get saved. It usually takes a handful of seconds, after which you will see a bright green Changes have been saved message under Edit Web Domain.
How to Install SSL In aaPanel
If you use aaPanel, you can install SSL via these instructions.
Step 1
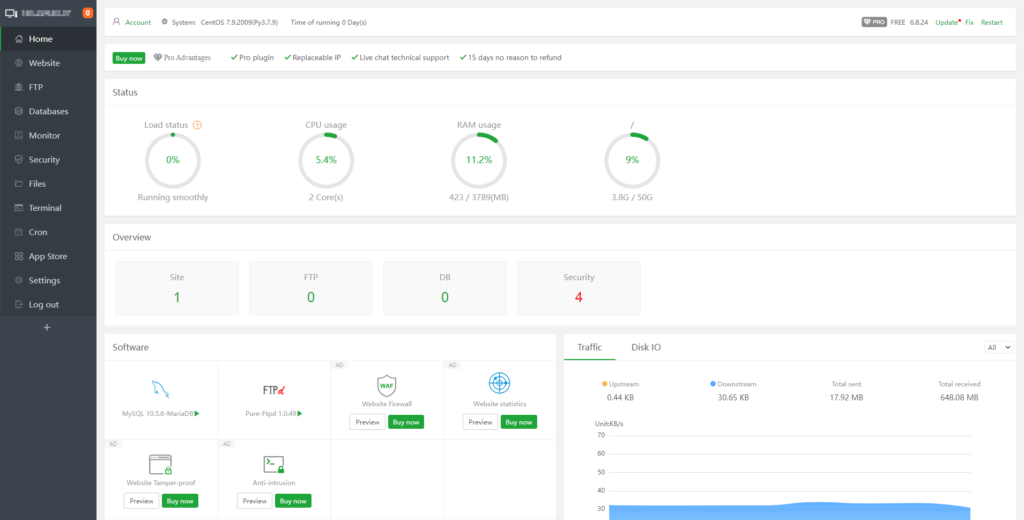
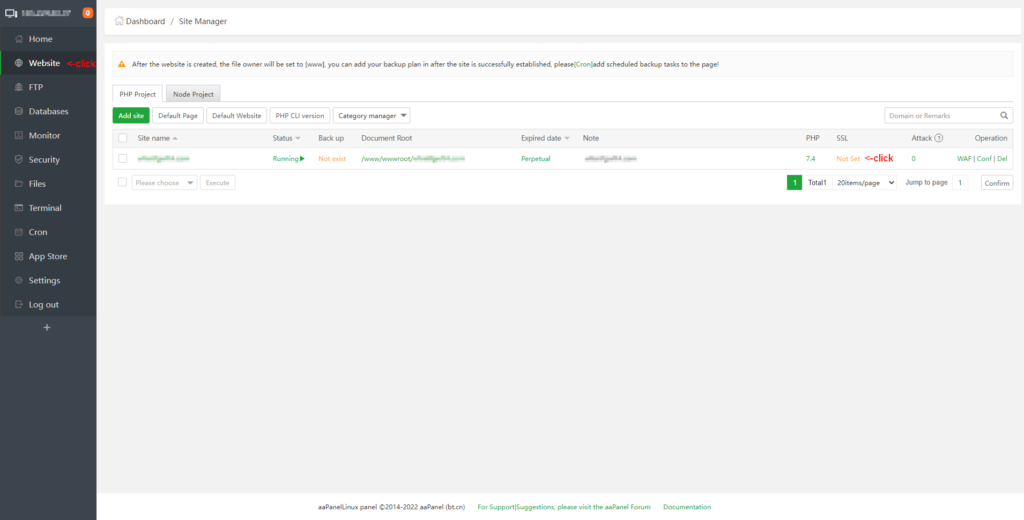
Log in to your aaPanel. Your homepage should resemble the image below.
Step 2
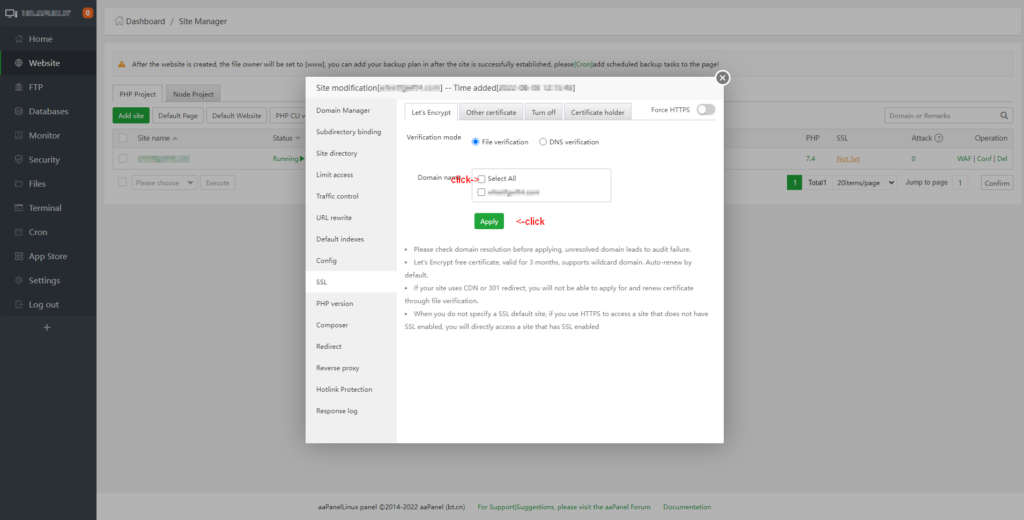
Select Website (located right below the Home tab). Then, click Not Set under SSL, as indicated in the following image.
Step 3
In the pop-up, click Select All to mark all your domains.
Step 4
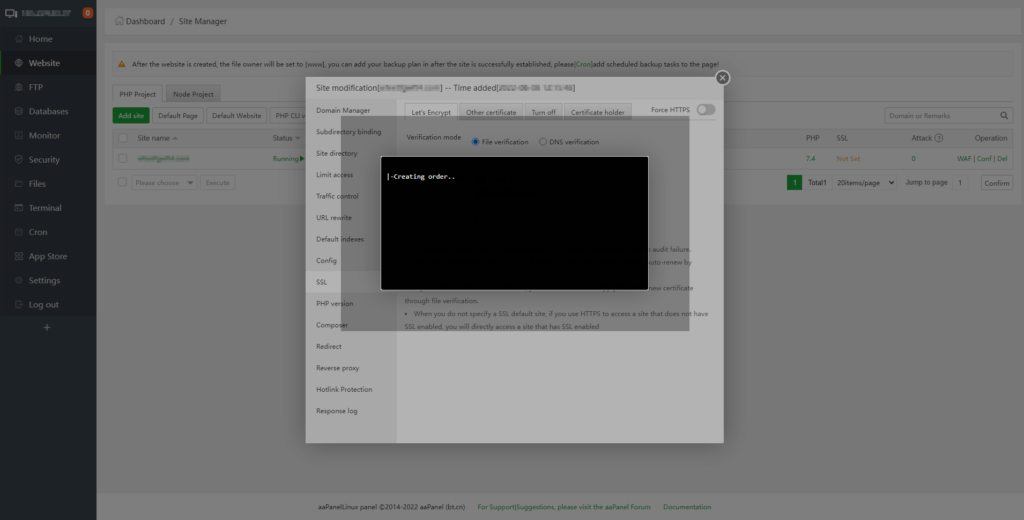
A new pop-up will appear, reading Creating order… Wait until the process is complete, which usually takes a couple of seconds.
Step 5
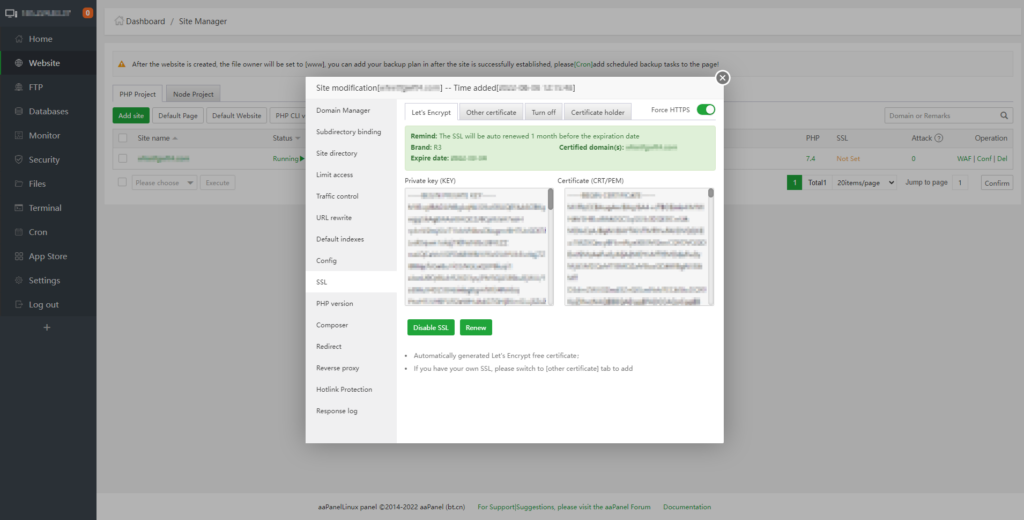
As soon as the black pop-up disappears, you will be all set. To finish everything off, toggle the Enable HTTPS switch on.
How to Install SSL in CyberPanel
Follow these steps to enable SSL in CyberPanel.
Step 1
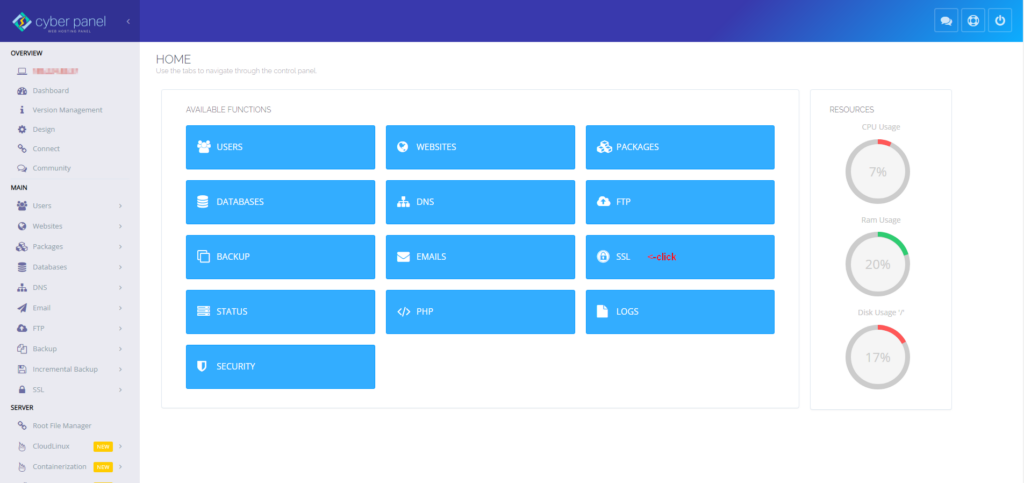
Log in to your CyberPanel and select SSL as indicated in the picture below.
Step 2
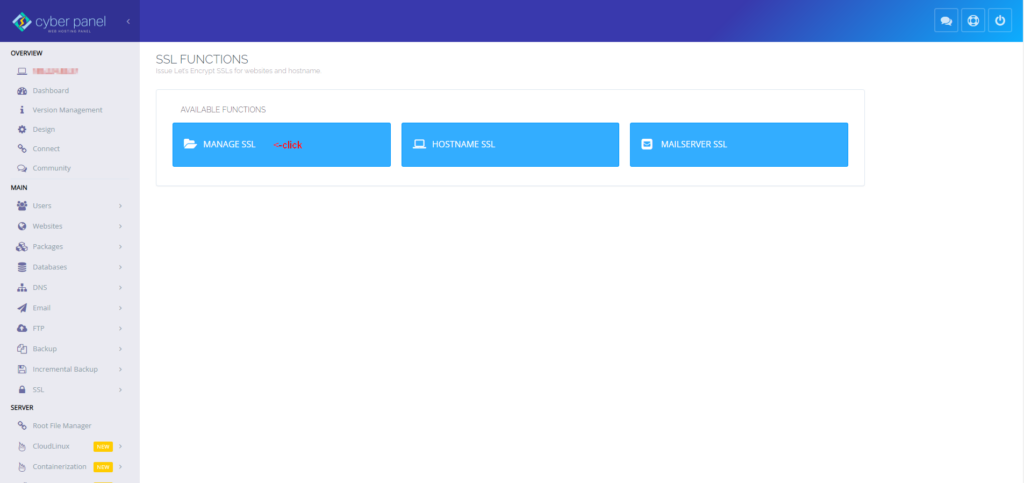
Click on Manage SSL.
Step 3
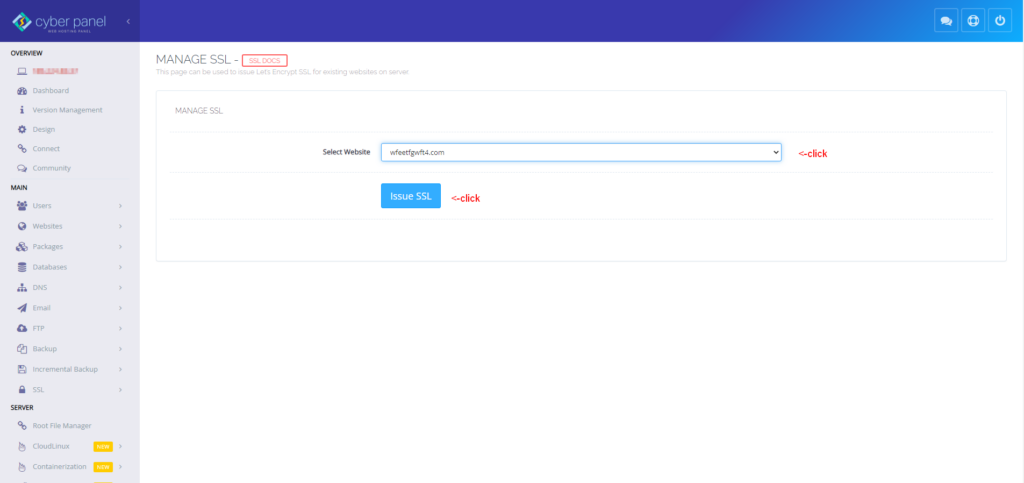
Select the desired domain from the drop-down menu, then click Issue SSL.
Step 4
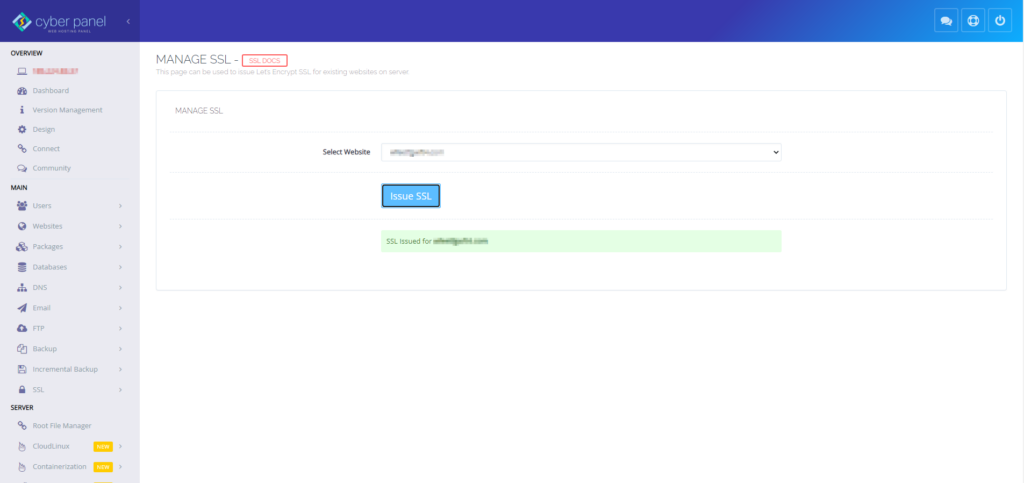
Give it some time, and you will see a green SSL issued message. At this point, you are all set.
Final Checks
Once you complete the steps above for the relevant CP, your next move should be to see if your website is now SSL-encrypted. You can do so by looking at your URL and checking for the HTTPS marker and the safety padlock sign.
In case there are any issues, you should contact your hosting provider and inquire about them.
Conclusion
Installing SSL on your website is crucial for enhancing your overall security, protecting all private information, and fostering trust among your customers.
By using the steps outlined above, you can complete this process seamlessly and focus on building your brand and expanding your reach, knowing that your audience will be safe at all times.
Author
Monica Jansen
Monica Jansen is a seasoned tech writer focused on web hosting and cybersecurity. She loves doing deep dives and whittling down difficult topics into simple and succinct concepts. Whether she is covering firewalls or different hosting plans, she always strives to provide clear guides that website owners of all skill levels can follow.
Add your comment
Get content delivered straight to your inbox


Your data.
Your choice.
Work with the best of the best — your projects deserve it.