Back to Blog


Monica Jansen
Jul 10, 2026
How To Install WordPress via aaPanel
Today, various types of software allow people to create and maintain websites without much coding knowledge and experience. WordPress is the prime example and one of the most widely used website tools in the world.
Do you want to join the army of users already taking advantage of WordPress and all its perks? Our step-by-step guide on the WordPress installation process via aaPanel will help you, as it’ll cover:
- What WordPress is and why it is so popular
- How WordPress can be installed
- The installation steps in aaPanel
Read on!
What Is WordPress?
WordPress is an open-source content management system that allows users to make and run websites without prior programming skills. As such, this tool ensures that even non-developers can own and operate successful sites.
To put into perspective just how popular and widely used WordPress is, we’ll mention that it powers almost 43% of all websites in the world. In terms of numbers, that translates to over 800 million websites.
The secret behind its success is simple: it’s accessible and versatile. For one, using WordPress for your website is entirely cost-free. Thus, the only spendings come from hosting the website, which is a relief for many site owners.
Additionally, WordPress can be used to build all types of sites, including blogs, business platforms, and eCommerce stores, to name a few. These sites can all be completely unique and customized, as you can choose between countless themes or even modify the code directly.
How Do You Install WordPress?
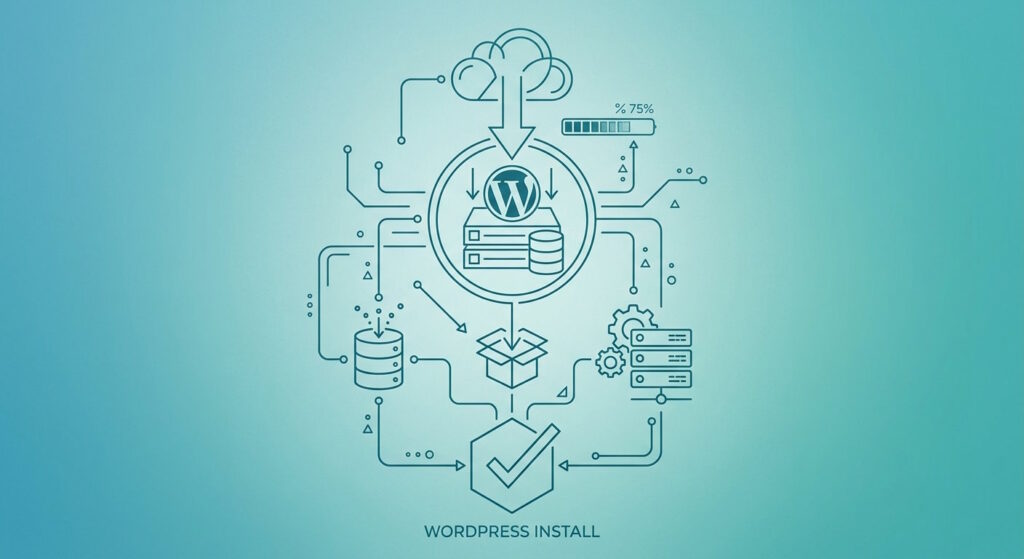
As we have already mentioned, anyone can use and install WordPress. Doing so requires little to no programming knowledge, and it can be done manually.
Naturally, this process is time-consuming, and it requires at least some level of technical knowledge.
Fortunately, in addition to installing the software on your own, you can also lean on various hosting providers to complete the process for you. In fact, many of them allow you to install it in a handful of steps, as WordPress is often a part of their hosting plans and packages.
Installing WordPress via aaPanel
At AbeloHost, we offer our users effortless WordPress installation via various control panels. We will outline all the steps for aaPanel in the sections that follow, read on!
Deploying VPS
To initiate the installation process, we first need to deploy our Virtual Private Server on your Abelo account. Follow the steps below to complete this process.
Step 1
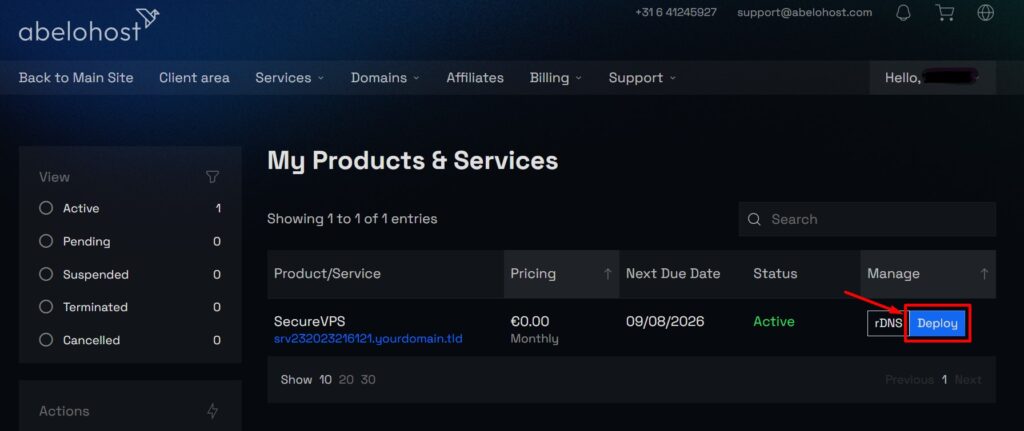
Log in to your Abelo account and click the Services tab. On the page, select Deploy, as shown in the following picture:
Step 2
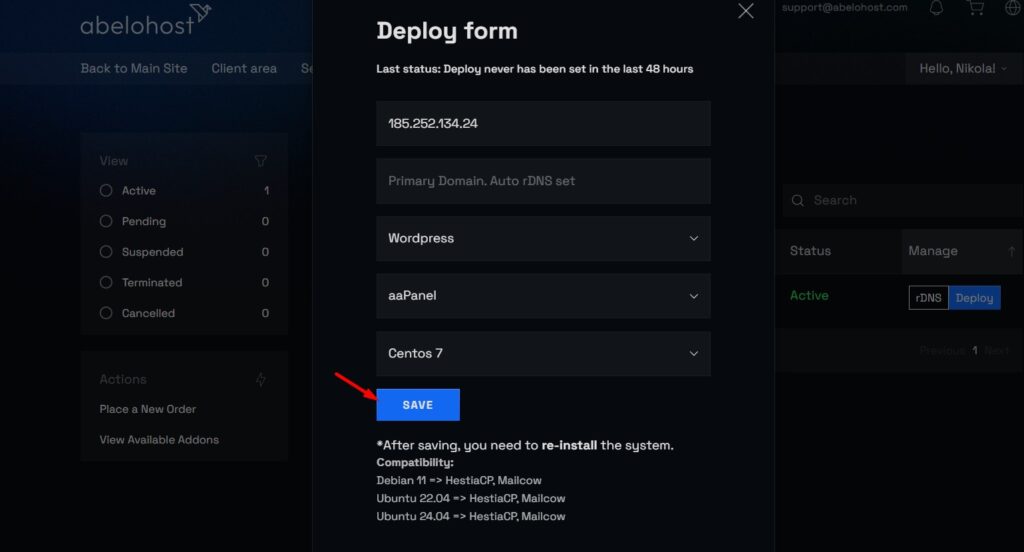
You will see a Deploy form pop up on your screen, and you’ll have to input some information. That includes your domain name, as well as opting for aaPanel and CentOS 7 for your CP and OS. It should look like the image below.
Step 3
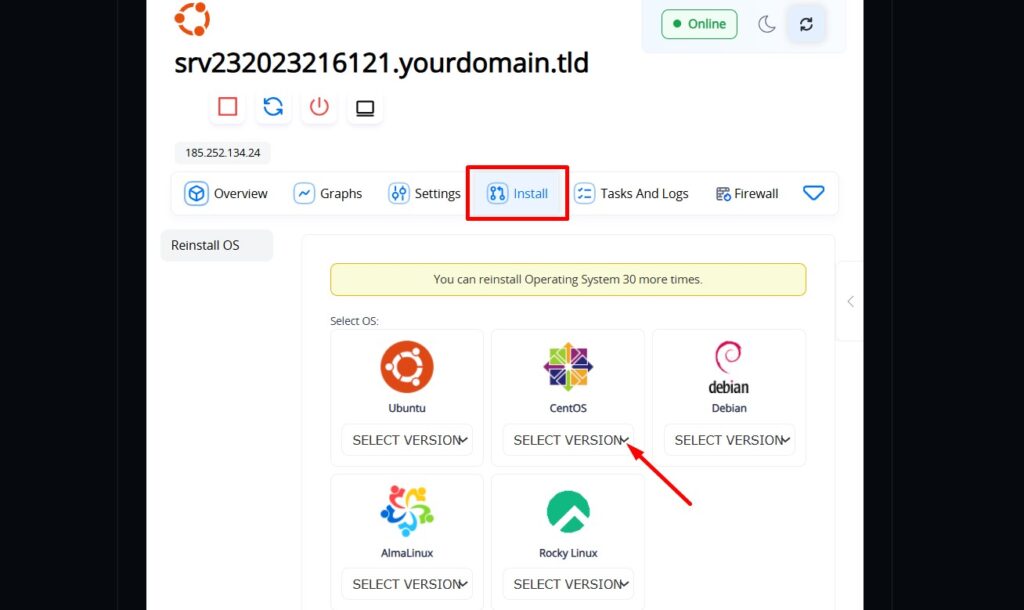
Now, you will need to reinstall your OS. To do so, you should head to your Services, scroll down to the VPS management menu, and click Install and choose your preferred version of CentOS.
Step 4
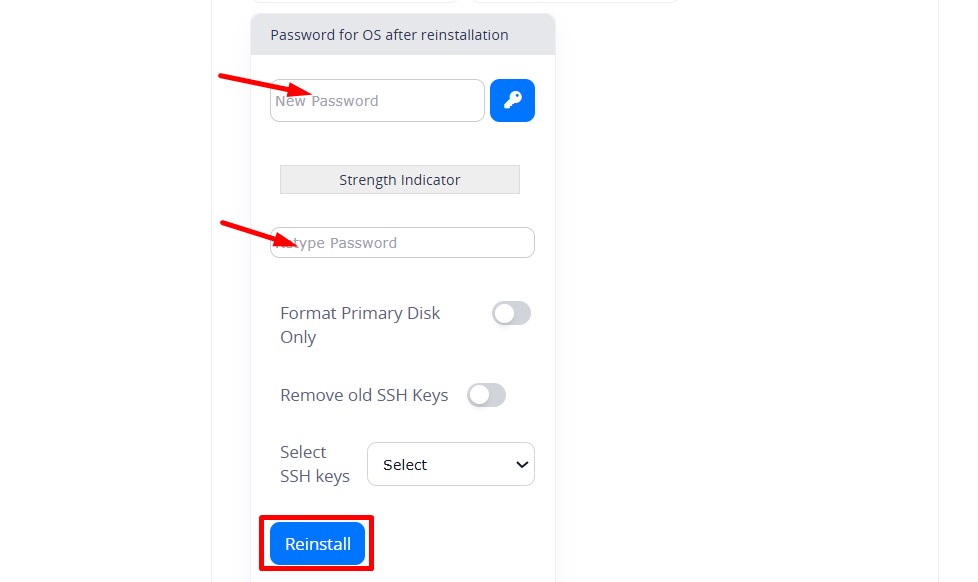
Your next step is to scroll down and choose a password, retype it, and click Reinstall.
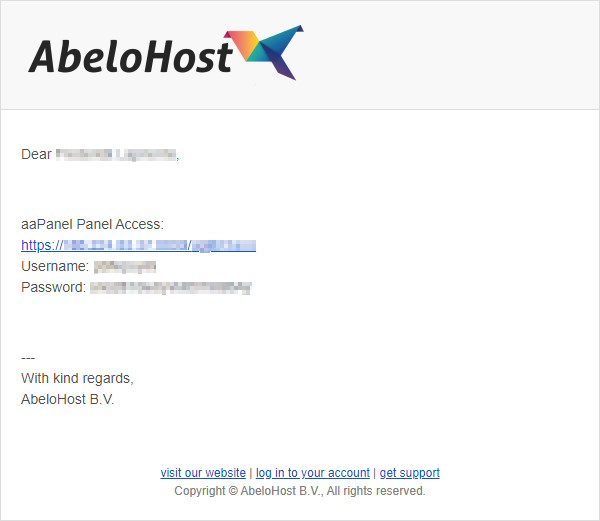
When the deployment process is complete, you will receive an email from AbeloHost containing your username and password, as well as an aaPanel access link. The following image displays what it should look like.
Enabling SSL
Before you can initiate the WordPress installation process, you will have to enable SSL for your website. We will now outline the steps you should follow.
Step 1
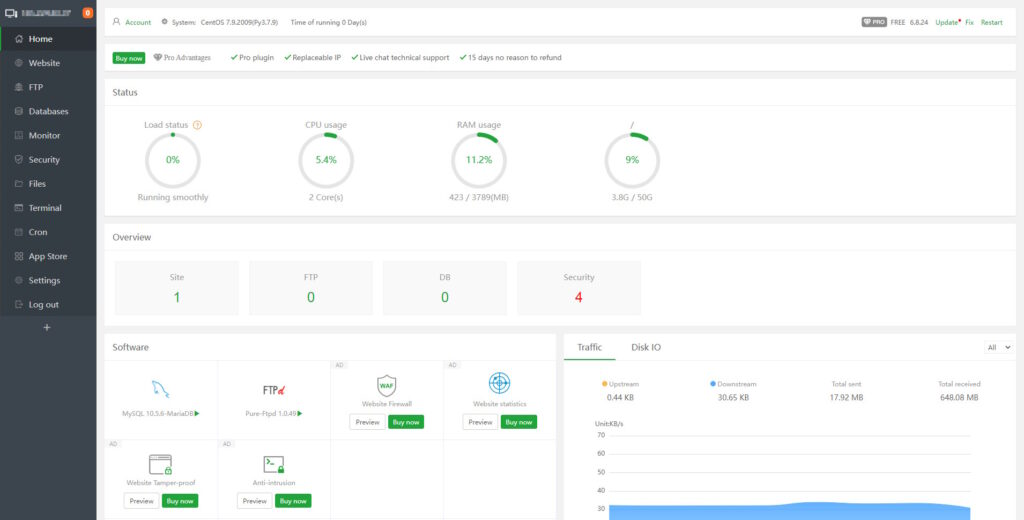
For starters, click the link from the AbeloHost email you received and log in to aaPanel using the username and password combination provided. The main page will open.
Step 2
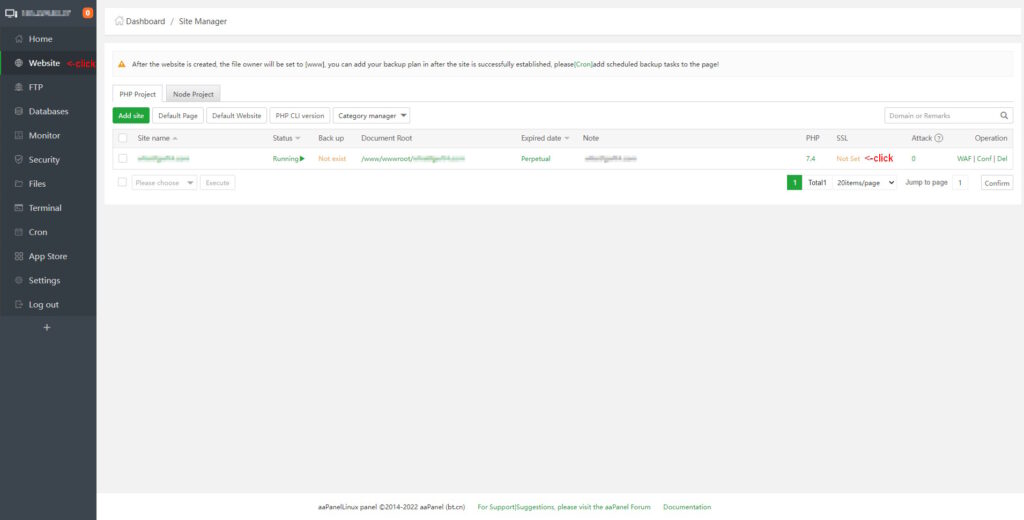
Head over to the Website section in the menu on your left. Select Not Set, as indicated in the following image.
Step 3
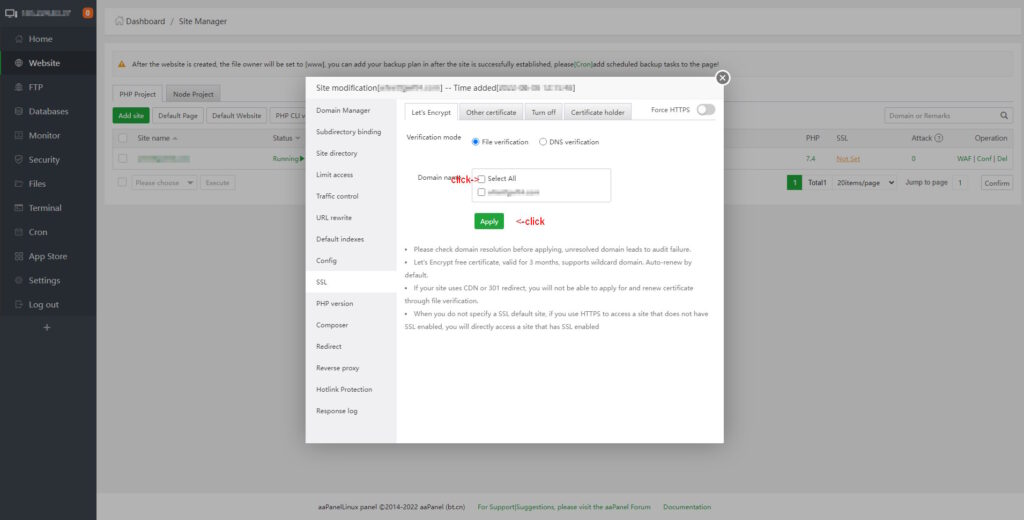
In the pop-up, select your domain and click Apply.
Step 4
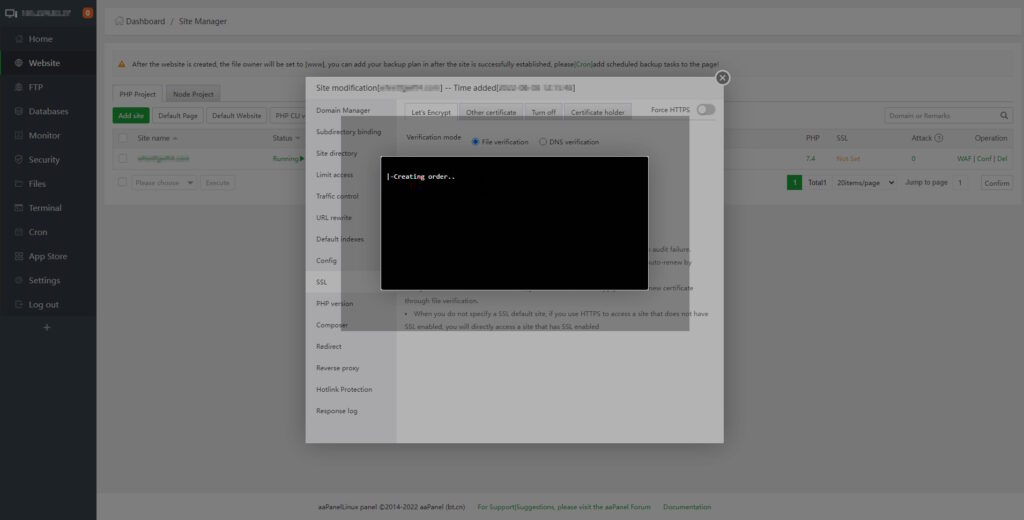
You will see a new pop-up on your screen — wait it out.
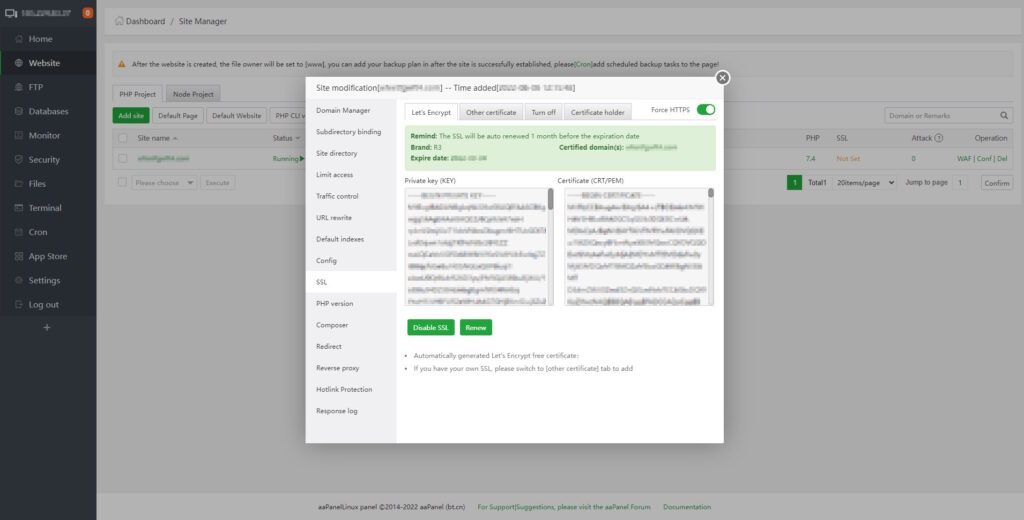
Once enabling SSL is complete, your screen will look like the following image.
Installing WordPress
At last, follow the instructions in the subsequent sections to install WordPress.
Step 1
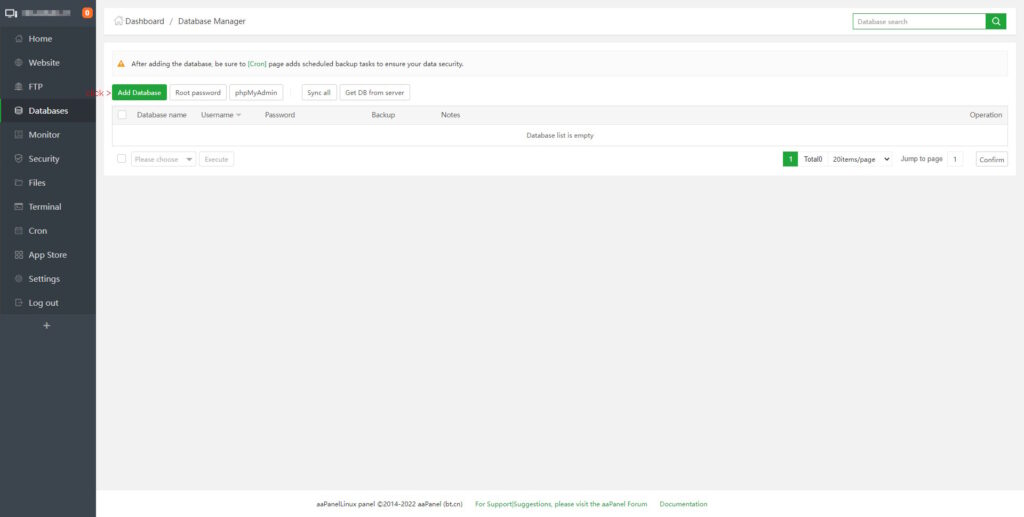
Our first order of business is creating a Database for your WordPress installation. Head over to the Database section on the left, and select Add Database.
Step 2
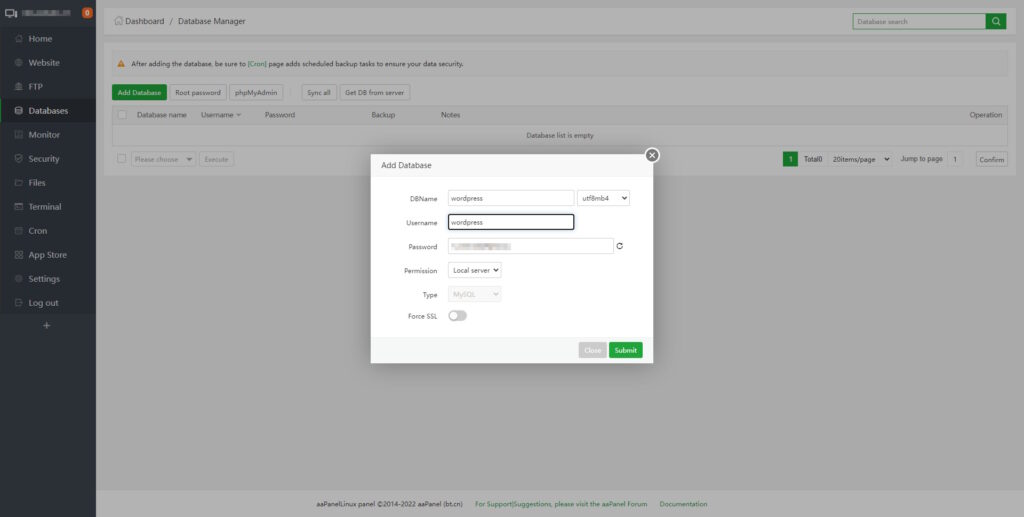
Input the DBName, username, and password. Then, choose utf8mb4 from the drop-down menu. Click Submit, but don’t forget to copy and paste the username and password you used, as you will be using them later on.
Step 3
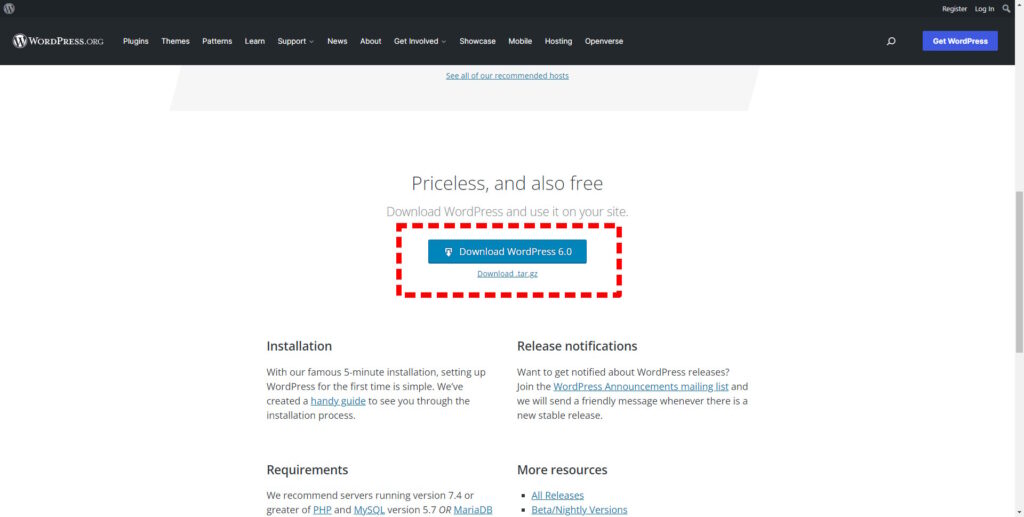
Now, it is time to download the latest version of WordPress. You can do so at their official website by clicking the Download WordPress button on the homepage. Alternatively, you can use the .tar.gz link directly beneath the button.
Step 4
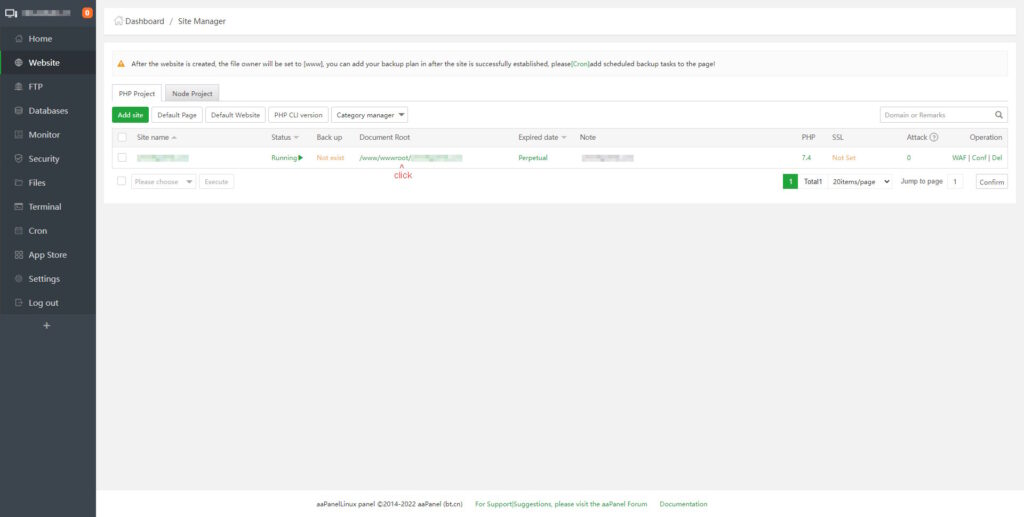
Go back to your aaPanel homepage. Click on the Website tab, and then tap Download Root.
Step 5
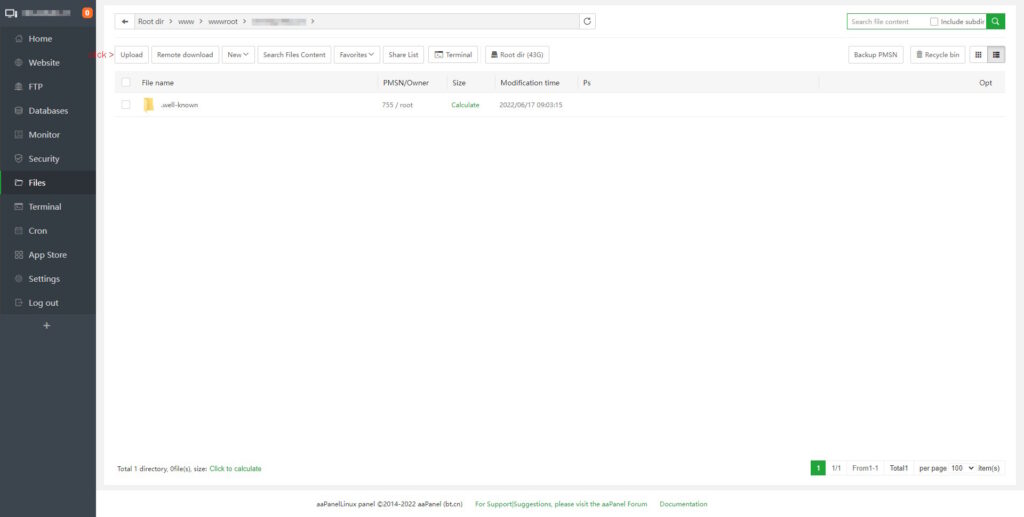
On the new page, select Upload.
Step 6
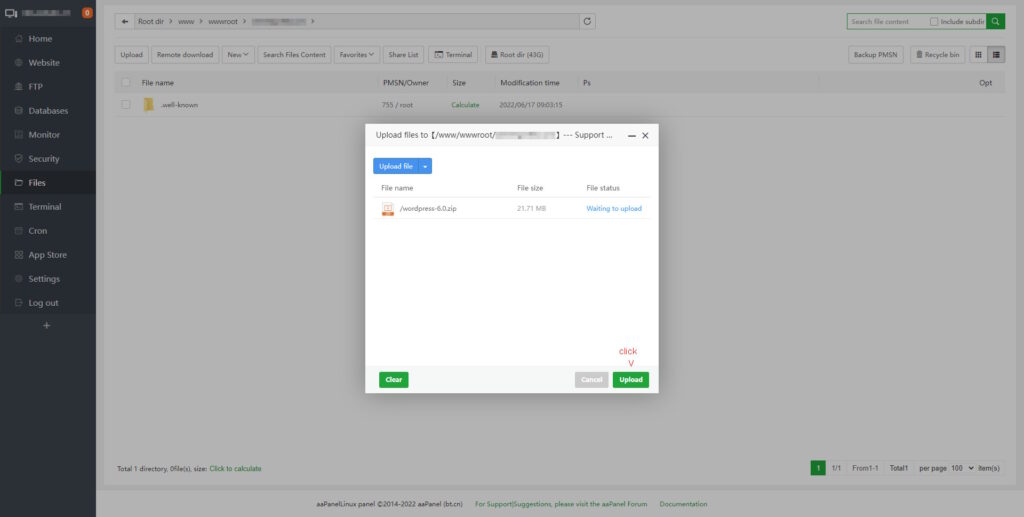
Now, you need to upload the WordPress archive you have just downloaded. You can do so by clicking the blue Upload File button on the pop-up page on your screen and selecting the file in your library. Alternatively, you can drag and drop the file manually. When you are done, tap the green Upload button.
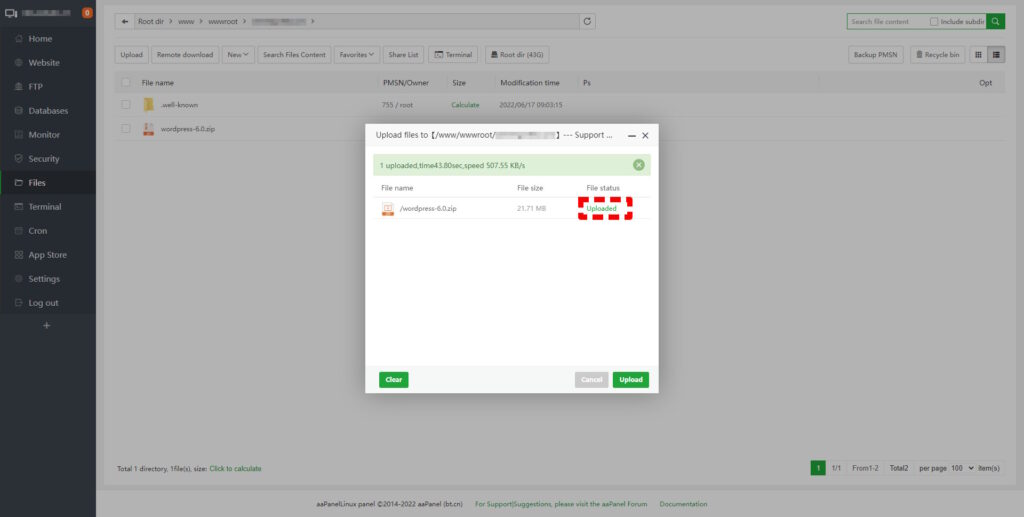
You will have to wait a bit for the files to upload. Once they do, you will see the Uploaded sign, at which point you can close the pop-up.
Step 7
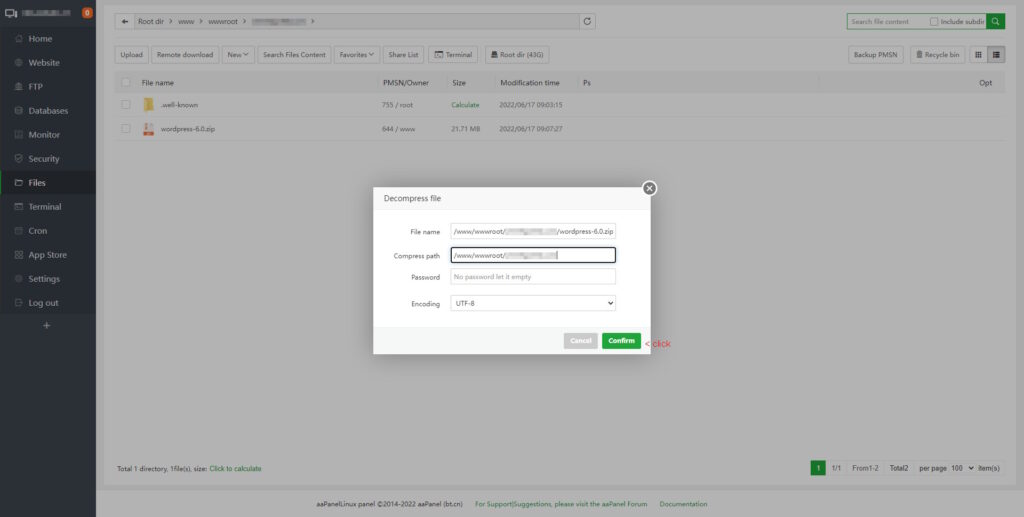
At this point, you’ll be able to see the newly uploaded WordPress archive on your screen. Double-click it, and then select the green Confirm button on the window that pops up.
Step 8
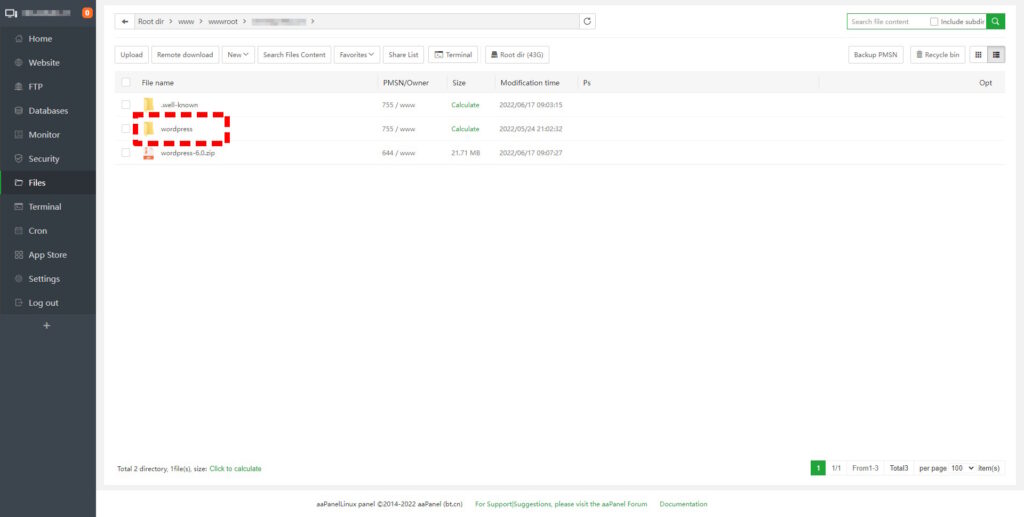
A new folder titled WordPress will appear — click on it.
Step 9
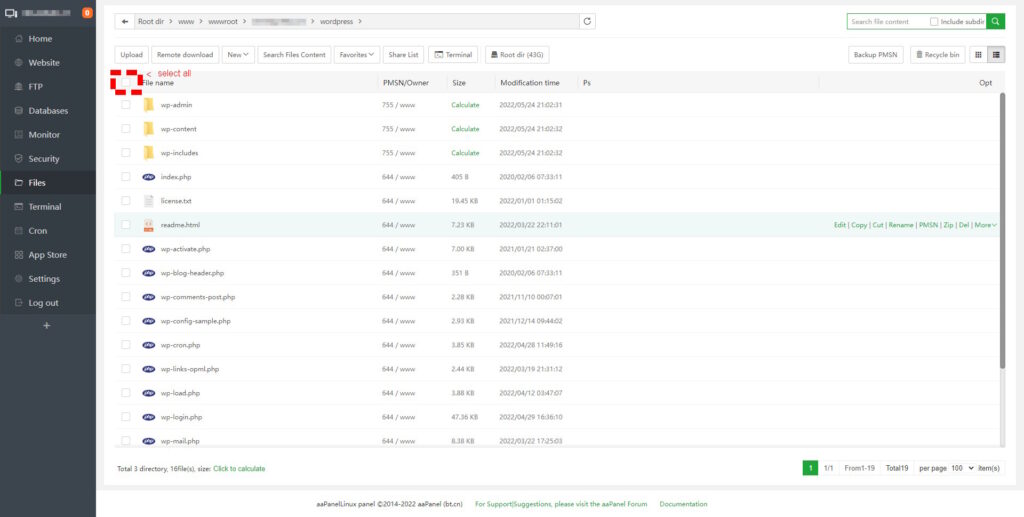
Select all the files that appear once you enter the folder by checking the box as indicated below.
Step 10
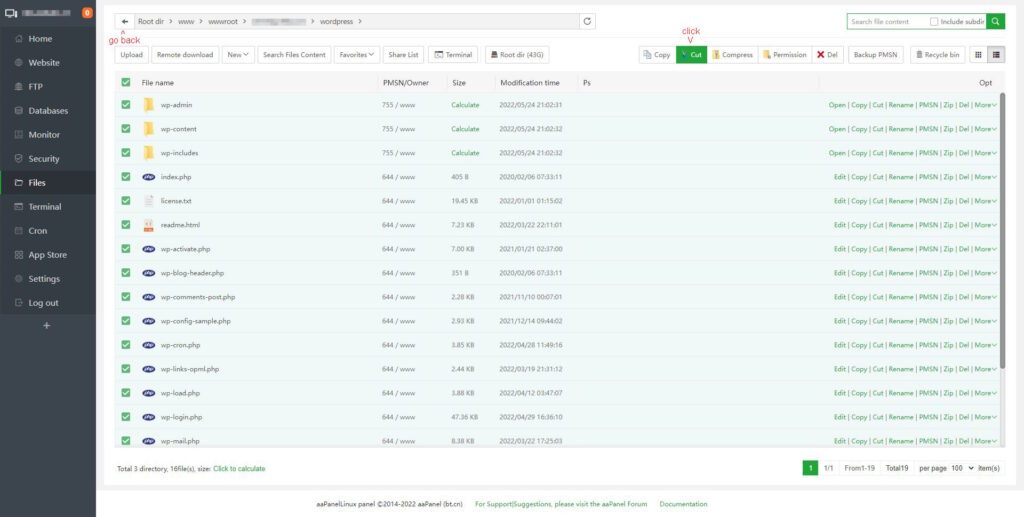
Select the green Cut button, and then the backward arrow to go back to the main folder page.
Step 11
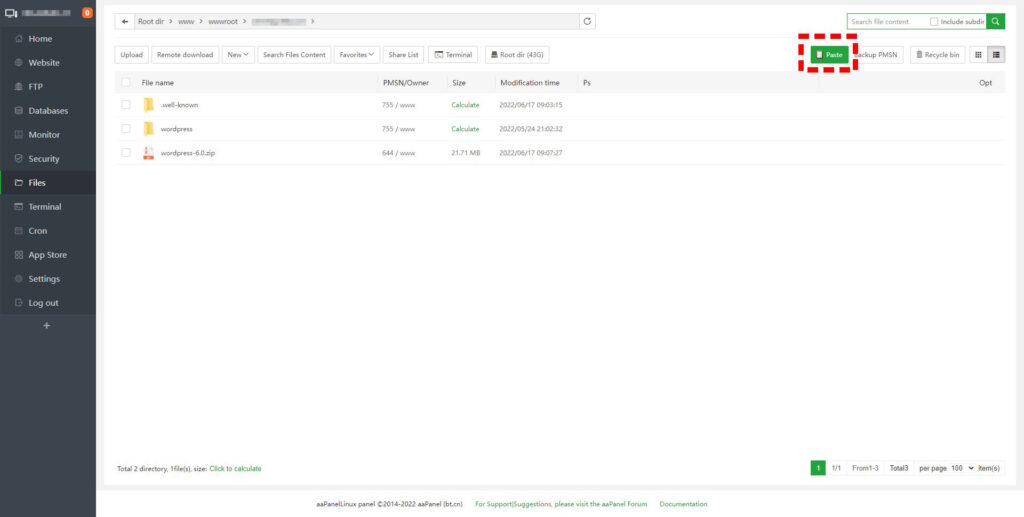
Click the green Paste button, as below.
Step 12
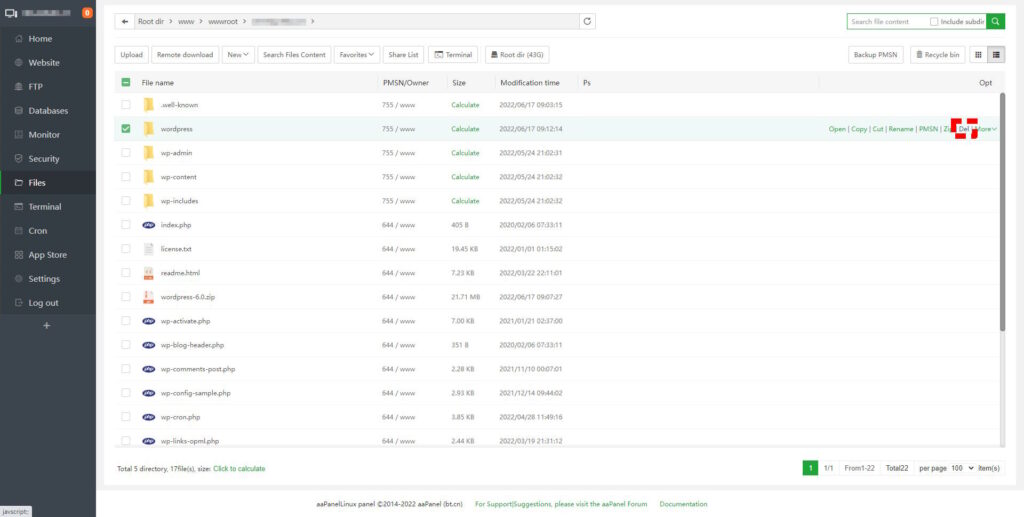
Since you no longer need it, you can now select the WordPress folder and delete all its contents. Simply click the Del option.
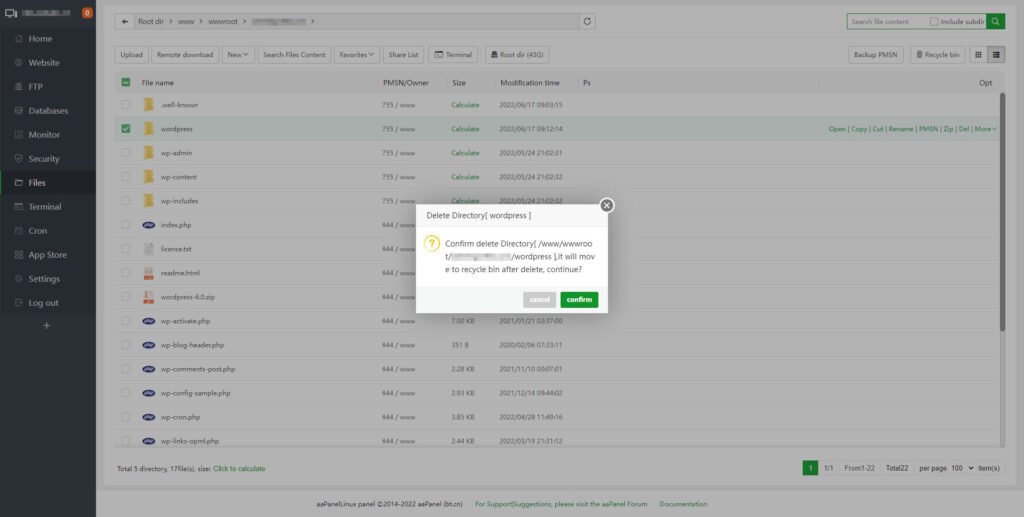
To delete, tap Confirm on the pop-up.
Step 13
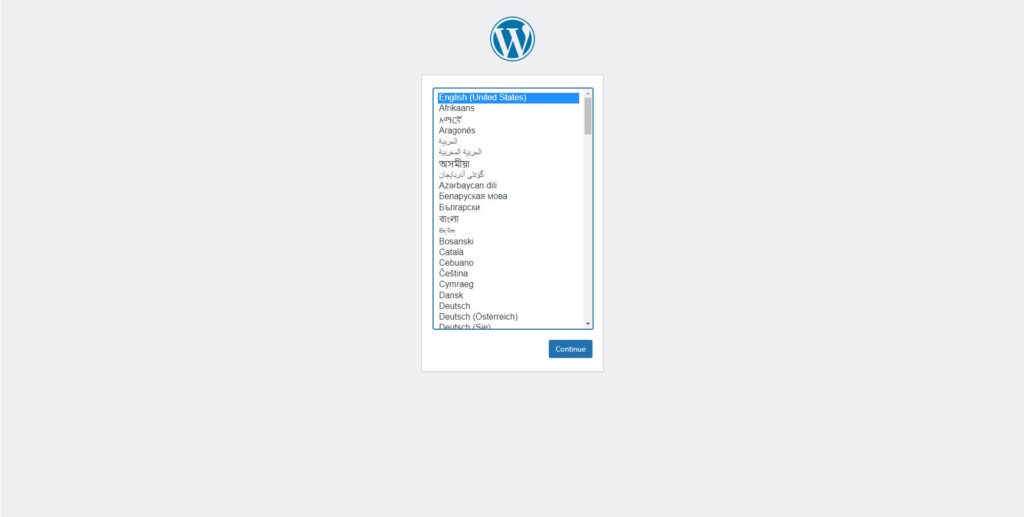
Now, type your domain into your browser. You will see the WordPress installation tool. For starters, pick the language you want to use.
Step 14
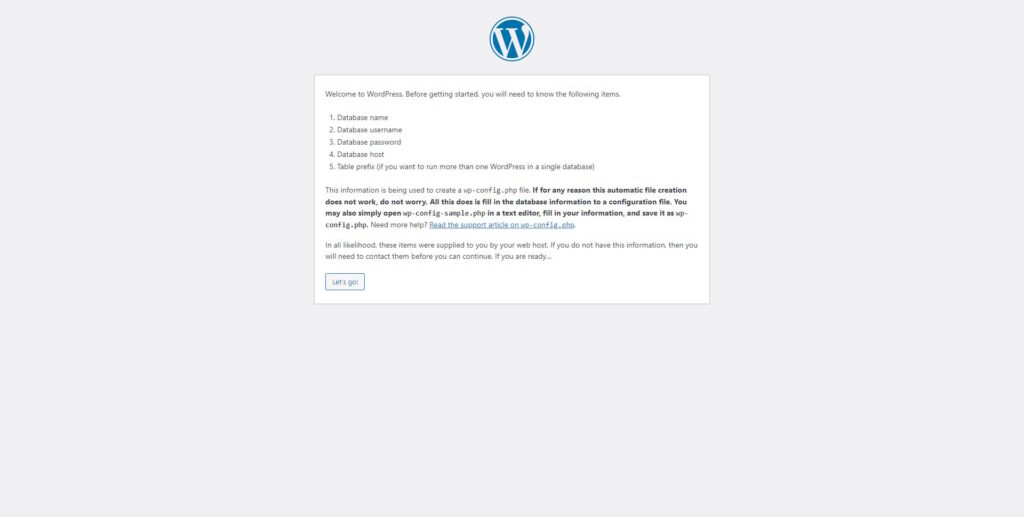
On the next page, select Let’s Go!
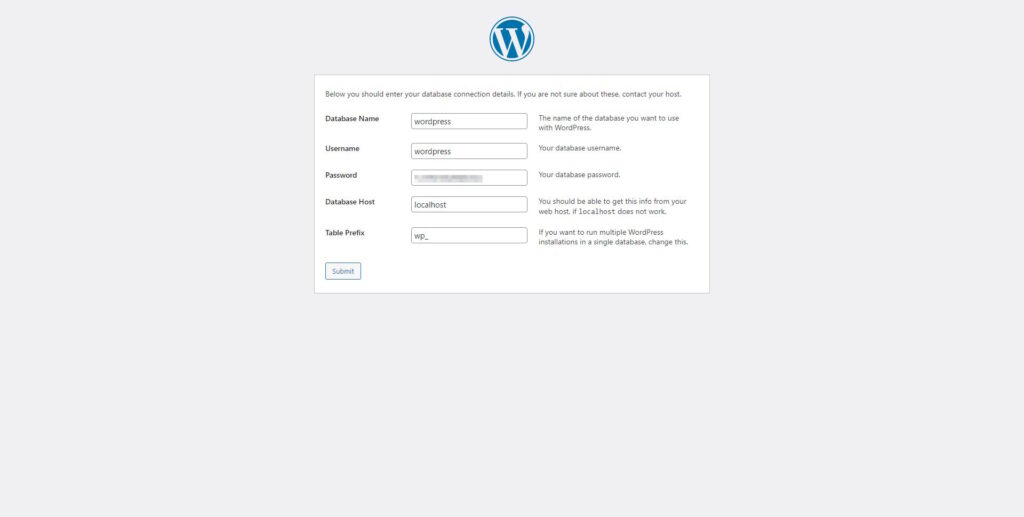
Step 15
Input your database login details (from Step 2).
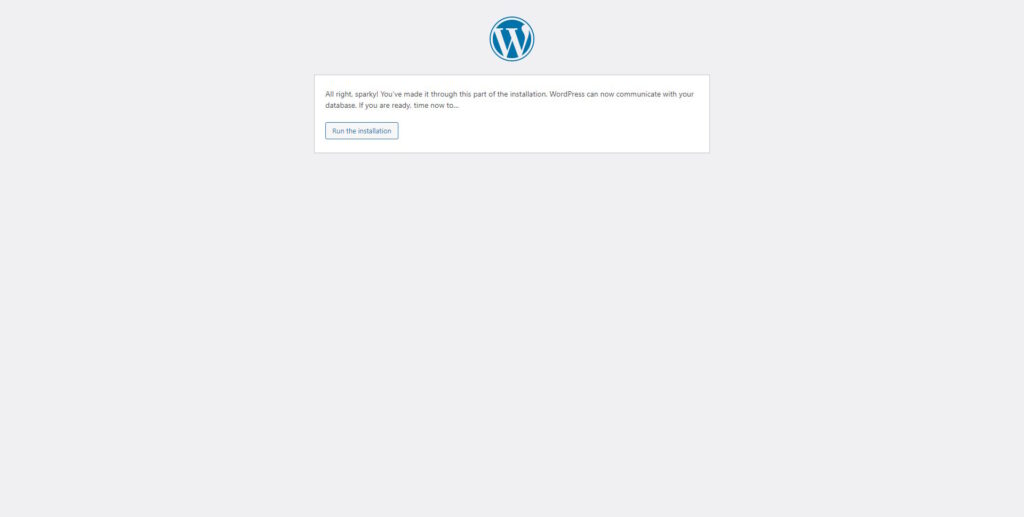
Step 16
On the following page, click Run the Installation.
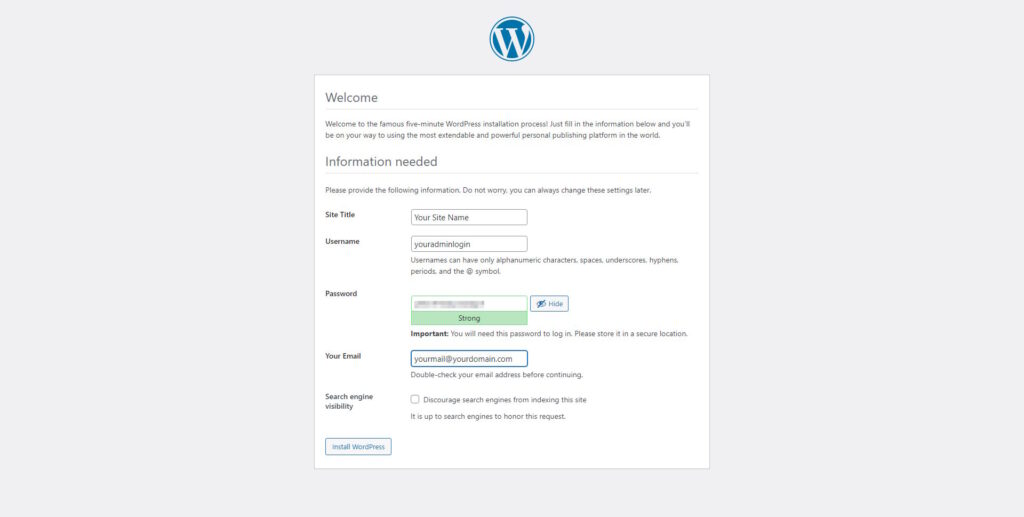
Step 17
Now, you are almost done installing WordPress. All that’s left to do is fill out the Site Title, Username, Password, and Your Email boxes. When you are done, click the Install WordPress button.
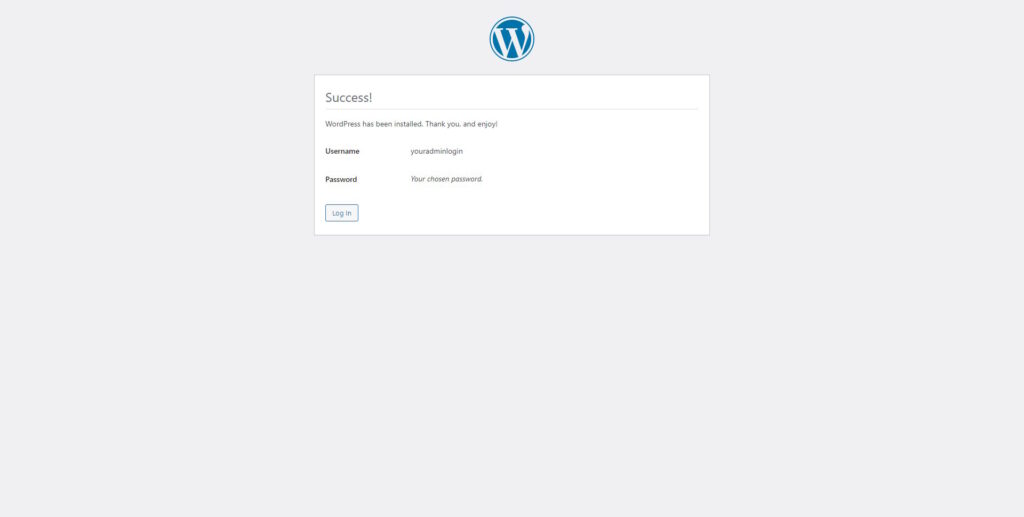
Once the Success page appears, you will be all set.
In Case Of Trouble…
If you run into any issues during the process, it is best to contact your hosting service right away. In most instances, they will be able to resolve it shortly and help you complete the process.
Conclusion
Now that you have installed WordPress via aaPanel, you are ready to make your website. You can also look at our guides on creating subdomains and setting up email using aaPanel. Take advantage of all the perks this software offers, and you will be running a superstar site in no time.
Author
Monica Jansen
Monica Jansen is a seasoned tech writer focused on web hosting and cybersecurity. She loves doing deep dives and whittling down difficult topics into simple and succinct concepts. Whether she is covering firewalls or different hosting plans, she always strives to provide clear guides that website owners of all skill levels can follow.
Add your comment
Get content delivered straight to your inbox



Your data.
Your choice.
Work with the best of the best — your projects deserve it.